During todays lesson I continued typing up my edit decision list which I has written on paper when I first went through my shots to decide which ones i want to use. I also scanned in my contextual work which will allow the people to see my work and what I had to do to begin filming and how these processes help me to create a product that is successful following legal conditions.
Production Log 15/3/2013
15 MarDuring todays lesson I began editing my music video which allowed me to carry on my experience and knowledge of the program for future reference. I uploaded my work last lesson to the Mac so I was prepared to begin piecing together my music video. I began by changing of the format to go into my video production which allowed me to listen to the music whilst placing my video together which helps me to edit and cut the scenes in time with the music allowing the style and the piece to flow better overall.
I began piecing together my music video which allowed me to develop the story from my storyboard as the locations and plans that I had created needed to be changes to ensure that the video was succesful. You are able to see in the production of my music video the changes I have made and I shall evaluate and expand on in my evaluation where I will be able to discuss in-depth the changes that I’ve made.
In the lesson I expanded my understanding of Final Cut Pro which will help me in future projects. I now know how to place music into a production piece and how to seal music so it doesn’t move when placing clips within the piece.
Production Log – 1.03.2013
1 MarDuring todays lesson i continued with my site plans and completed my risk assessment which helped me to look at possible problems that may occur and how I can deal with the problems if they arise. This allows me to be more prepared for the recording part. It will allow me to look in more detail at my surroundings and problems and damage that might occur which will help me to make sure the films is successful and I make the most of my time. I focused on my research task as it allowed me to search through the internet to find sources and contact information for my location scout which will help me if any issues arise within the filming process.
Production Log – 15.02.2013
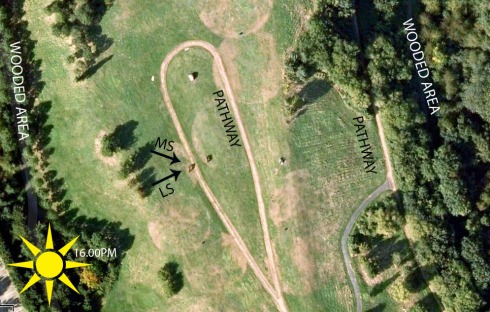
15 FebIn todays lesson I completed my Location scout and began my Location Site Plans which allowed me to source my locations to a specifics which will really help me to gain an understanding of the logistics for film so picking locations that are near each other will be really helpful when trying to film. It also allowed me to get a clear visual of what the music video will actually look like allowing me to visualises the appearance completely for the first time. I then moved onto the creation of my site plans which allowed me to look at the surroundings including routes and dangers that may appear which will help to minimise problems when filming. It also allowed me to think logistically about where the sun will be and how busy it will be which will help me to limit problems that may occur through filming.
For both of the pre production documents I used Google Images and Maps to get the visuals of what I was talking about. I found it hard to get some images of locations that I was looking for so I had to use pre taken photographs from other people which helped me to look at issues that may occur. Google maps allowed me to monitor distance and space for the filming of my music video which worked really well to help me in future elements of the project.
Production Log – 1/2/2013
1 Feb– Demonstrate knowledge and understanding of planning techniques.
– Increase my research skills.
During todays lesson I created my storyboard through the use of a bamboo tablet which allowed me to create images for my storyboard through photoshop. By using this technology I was able to try a new idea with my work and expand my creative style through the use of computer produced images. I spent the lesson trying to grasp the technique which I initially found very hard however throughout the lesson I managed to get the hang of it and managed to complete a page full of drawings which identified the scenes and shots within my music video.
Production Log – 29.01.2013
29 Jan During todays lesson I began my storyboard after completing my script, by beginning my storyboard I was able to visualise the movement within and between the scenes which really helped me to come up and interpret ideas that I had developed. I began by planning the format of shots that I wanted in the order that I thought would flow best within the piece. I have done storyboards however this time I took a much more artistic approach to deal with the style and the progression of the ideas whilst also creating a compatible design template that helped me to develop my visual ideas. I chose to do my storyboard drawings by hand as it allowed me to sketch exactly what I had in mind for the production of my video. Here is the beginning of my storyboard which shows you the first two shots of my video, I have not labelled and written about the shots which is something I plan to do when I have completed the drawings so that the correlation between the shots is clear.
Production Log – 18.01.2013
18 JanIn todays lesson I continued with work on my script to ensure that my actors understand how I want it to work and what themes I want to run through out. Creating the script has helped to understand what I want to come from my product and the way that I want it to work overall as a video. I found it hard to work out a logical sense of time for the scenes so it works overall as I am not able to see it visually but I managed to overcome this as I listened to the song and visualised what I want to happen for that length of time which I then wrote down on the script as I went through the lines which allowed it to work overall as a script. I also redesigned my logo which I have chosen to change for an image instead of text so that it connects more with my product and the visuals that I want to come through within my project.
Production Log – 08.1.2013
8 JanDuring todays lesson I completed my treatment outlining what the sales points and all details that link to the production of the music video. I then began the production of my script in which I began outlining the camera movements and the way in which the actors will interact allowing throughout the video. By beginning my script for the video I am able to fully imagine for the first time what my complete product will look like as it helps me to envisage the movements and the way that the actors will feel and how it has a correlation to the lyrics of the song. By completing my treatment I was able to create my target audience and the way in which they live and act as well as creating the first outline of what I want from the music video whilst also thinking about the mood of the video to help accentuate the characters mood and the plot of the music video extending the distinctive storyline.
Production Log – 05.01.2013
4 JanDuring todays lesson I began work on my pre production documents which allowed me to begin planning on my pre production documents which I need to complete to begin the filming of my music video. I began by writing what I planning what I would complete by placing it in my production schedule which allows me to see what I need to do and what I have completed to stay on track with my work. I began my treatment which helped me to outline my project as well as trying to create a product that would appeal to an specific audience as well as a production company. I had to work out the budget for my production for my treatment I changed my focus to work on the budget which allowed me to look at the costs of the things I need to create a successful production from crew costs to visual cost i.e. make up and costume which all integral in creating a production that I feel reflects what I envisaged to a high standard.
Production Log – 18/12/2012
18 DecDuring todays lesson I carried on with the creation of my skeleton layouts and mocks ups to help me gain an understanding of how I want my final product to look and what response I want it to attract. I carried on with the continuation in the colour scheme from my digipak as it works to show unity between the different elements which lets the audience identify the connection between the two. I began by creating my mock so I could identify the placement of which aspect should be placed where this also allowed me to create my advertisement in a clear way allowing it to flow better as a complete page. I carried on this work on photoshop so I could have creative control of the product as well as the ability to manipulate the way I want it to look in term of colour and shape.


